Universal Red/Green/Blue/White (RGBW) LED WiFi Compatible Controller & Dimmer without remote. Use to control up to four separate "zones" of RGBW LED strips that will be linked and controlled by one or several wireless remotes or smartphones with the Wi-Fi LED Controller Hub. Synchronization function allows a single remote to operate one or multiple controllers (User configurable). Maximum load is 6 amps per channel, 24 amps total. Must be paired with Wi-Fi LED Controller Hub (WIFI-CON -- Sold separately) for adjusting all controller functions using a Smartphone or tablet running Android or iOS using free app 'milight'.
Specifications:
Item type: 2.4G WiFi Controller
Button number: 0
Certification: CE
Remote distance: 20-30m
Material: ABS
Radio frequency: 2.4G
Power supply: DC5V, 500mA
WiFi controller size: 8.9 x 6.5 x 1.5cm / 3.5 x 2.6 x 0.6in
WiFi controller weight: 50g / 1.8oz
Package size: 11 x 8.5 x 3cm / 4.3 x 3.3 x 1.2in
Package weight: 87g / 3.1oz
Wireless Remote
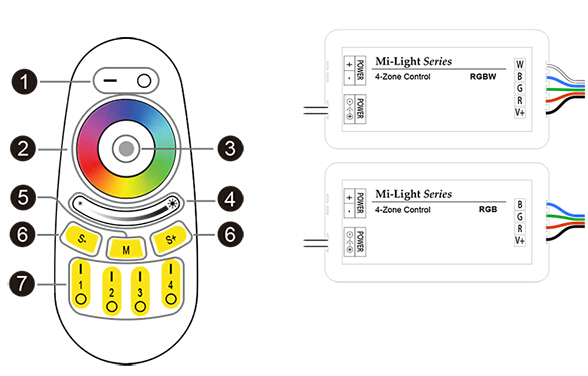
1. Master On(–)/Off(O)
A master On(-)/Off(O) control for all zone-linked RGB(W) light strips. Also activates the “Master†function, which allows the remote to control the RGB(W) light strips of all zones. If a zone is currently active, pressing the master On(-) button restores the "Master" function to the remote.
2. Color Selection Ring
Directly selects color along a circular spectrum. To obtain white light only, keep the “Zone On†(|) button depressed until the light changes to a steady bright white.
3. Selection LED Indicator
Flashes once to indicate when a command has been selected.
4. Brightness Touch Slider - Increase(Right Side)/Decrease(Left Side)
Increases(right side) or decreases(left side) the brightness level. Changing the active mode resets the brightness level to full.
5. Mode Start/Scroll(M)Â
Modes feature different color combinations, light transitions, and patterns, with 9 distinct modes. This button initiates the Mode function and scrolls through the modes in ascending order.
6. Mode Speed - Increase(S+)/Decrease(S-)
Increases (S+)/decreases(S-) the tempo of the mode pattern currently active
7. Zone On(|)/Off(O) - Zones 1-4
Allows up to four “zones†(i.e. channels) of RGB(W) light strips to be separately linked and controlled by the remote. Pressing one of the Zone On(|) buttons activates that zone; commands will affect only lights in that zone. Once linked to a zone, lights remain linked until they are unlinked. Steadily depressing the Zone On(|) button restores the lights in that zone to white.
Mode:Description
1:RBGW Fade In/Out:Red, green, blue and white fade in/out in a set cycle.
2:Color Flash:Red, green, blue, white, purple and yellow �flash in.
3:Disco:Red, green, blue, white, purple and yellow cycle in rotation with�flashing transitions.
4:Red Fade In and Flash:Red brightens to full brightness, then �flashes 3 times.
5:Green Fade In and Flash:Green brightens to full brightness, then �flashes 3 times.
6:Blue Fade In and Flash:Blue brightens to full brightness, then �flashes 3 times.
7:Color Fade In/Out and Flash:Multiple colors fade in/out and then �flash randomly.
8:3 Color Change with Fade In/Out:Multiple colors cycle with 3 smooth color changes followed by fade in/out.
9:White Fade In/Out:White �flashes continuously.
3)Linking Lights to Remote Zones
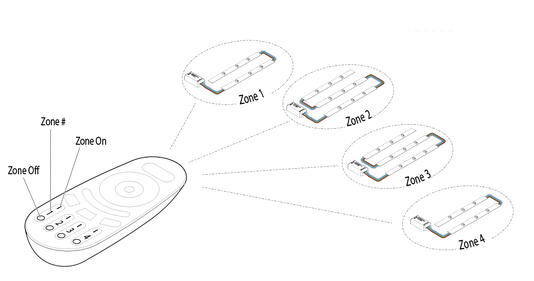
RGB(W) light strips are controlled exclusively by the multi-zone RF remote via the controller.
Linking a Light to a Remote
1.Switch off the main power supply to the light.
2.Restore power and within 3 seconds, choosing one of the "Zone On" (|) buttons, depress the button until the light begins flashing. It will flash white 2 times, indicating that the light is now linked to that numbered zone and can be controlled via the remote.
Activating a Zone
To activate a specific zone, depress the "Zone On" (|) button. The zone is now active and remote commands will only affect lights linked to that zone.
Unlinking a Light to the Remote
1.Determine which zone the light is linked to. This can be done by testing the Zone On/Off controls for each zone on the remote.
2.Switch off the main power supply to the light.
3.Restore power and within 3 seconds, depress one of the "Zone On" (|) buttons until the light flashes 10 times, indicating that the light has been unlinked.
An unlimited number of RGB(W) light strips can be linked to a zone. All the lights linked to that zone will display the commands entered on the wireless remote. Conversely, a single RGB(W) light strip can be linked to multiple remotes. When the light is unlinked, it will be unlinked to all remotes. Note: The wireless remote operates using radio frequency. The remote controller’s use is not restricted by normal obstructions such as walls, doors, etc. Once programmed they can be installed anywhere in range of the remote (up to 65 ft. or 20m).
4)Set-Up Instructions
Remote
1.Install 2 AAA batteries (not included) in the wireless remote.
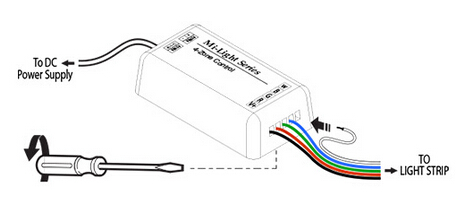
Controller
1.Make sure power to the controller is disconnected.
2.Using a small flathead screwdriver, loosen the five clamp screws on the underside of the controller.
3.Matching light strip wires to the labeled slots on the end of the controller, insert wires and tighten clamp screws, as shown below.
4.Turn power on and wait until RGB(W) light strip illuminates. If no illumination occurs, check light strips and wiring connections.
5.The RGB(W) light strip is ready for linking to the wireless remote.
Package Include:
1 * LED RGBW Receiver Box